3 · 原书 70–127 页任务管理
3.1本章引言与范围
本章旨在帮助读者清楚理解:
- FreeRTOS 如何把处理时间分配给应用中的每个任务;
- FreeRTOS 在任一时刻如何选择应当执行的任务;
- 各任务之间的相对优先级如何影响系统行为;
- 任务可能处于哪些状态。
读者还应掌握:
- 如何实现任务;
- 如何创建一个任务的一个或多个实例;
- 如何使用任务参数;
- 如何更改已创建任务的优先级;
- 如何删除任务;
- 如何用任务实现周期性处理(软件定时器在后续章节讨论);
- 空闲任务何时执行、以及如何使用它。
本章概念是理解 FreeRTOS 用法与 FreeRTOS 应用行为的基础,因此也是全书最详细的一章。
3.2任务函数
任务以 C 函数形式实现。它们唯一特别之处是原型:必须返回 void,并接收一个 void 指针参数,如清单 11 所示。
void ATaskFunction( void *pvParameters );
每个任务本身就是一个小程序:有入口点,通常在一个无限循环内永久运行,不会退出。典型任务结构见清单 12。
FreeRTOS 任务绝不允许从其实现函数返回:不能包含 return 语句,也不能让执行流越过函数末尾。若任务不再需要,应当显式删除,清单 12 也演示了这一点。
同一个任务函数定义可以用来创建任意数量的任务——每个被创建的任务都是独立的执行实例,拥有自己的栈,以及任务内部定义的自动(栈)变量的各自副本。
void ATaskFunction( void *pvParameters )
{
    /* Variables can be declared just as per a normal function.  Each instance of a task
       created using this example function will have its own copy of the lVariableExample
       variable.  This would not be true if the variable was declared static – in which case
       only one copy of the variable would exist, and this copy would be shared by each
       created instance of the task. (The prefixes added to variable names are described in
       section 1.5, Data Types and Coding Style Guide.) */
    int32_t lVariableExample = 0;

    /* A task will normally be implemented as an infinite loop. */
    for( ;; )
    {
        /* The code to implement the task functionality will go here. */
    }

    /* Should the task implementation ever break out of the above loop, then the task
       must be deleted before reaching the end of its implementing function.  The NULL
       parameter passed to the vTaskDelete() API function indicates that the task to be
       deleted is the calling (this) task.  The convention used to name API functions is
       described in section 1.5, Data Types and Coding Style Guide. */
    vTaskDelete( NULL );
}3.3顶层任务状态
一个应用可以包含许多任务。如果运行应用的处理器是单核的,任一时刻只能有一个任务在执行。这意味着任务只能处于运行(Running)与非运行(Not Running)两种状态之一。先看这个简化模型——但要记住它过度简化了;本章后面会说明,非运行状态实际上包含若干子状态。
任务处于运行态时,处理器正在执行该任务的代码;处于非运行态时,任务是休眠的,其现场已被保存,等待下次调度器决定让它进入运行态时恢复执行。任务恢复执行时,从上次离开运行态前正要执行的那条指令继续。
任务从非运行态转到运行态,称为被“切入(switch in / swapped in)”;反之,从运行态转到非运行态,称为被“切出(switch out / swapped out)”。只有 FreeRTOS 调度器能够把任务切入或切出。
3.4创建任务
3.4.1xTaskCreate() API 函数
FreeRTOS V9.0.0 还提供 xTaskCreateStatic() 函数,在编译期静态分配创建任务所需内存。任务通过 FreeRTOS 的 xTaskCreate() API 函数创建。它大概是所有 API 函数中最复杂的,不巧的是也是最先遇到的;但任务是多任务系统最基础的组件,必须首先掌握。本书配套示例都使用 xTaskCreate(),可参考的实例很多。数据类型与命名约定见 1.5 节。
BaseType_t xTaskCreate( TaskFunction_t pvTaskCode,
                        const char * const pcName,
                        uint16_t usStackDepth,
                        void *pvParameters,
                        UBaseType_t uxPriority,
TaskHandle_t *pxCreatedTask );| 参数名 / 返回值 | 说明 |
|---|---|
| pvTaskCode | 任务本质上是永不退出的 C 函数,通常实现为无限循环。pvTaskCode 就是指向实现该任务的函数的指针(实际上就是函数名)。 |
| pcName | 任务的描述性名称。FreeRTOS 不以任何方式使用它,纯粹作为调试辅助:用人可读的名称标识任务,比通过句柄识别简单得多。应用定义的常量 configMAX_TASK_NAME_LEN 规定任务名的最大长度(含 NULL 终止符);传入超长字符串会被静默截断。 |
| usStackDepth | 每个任务在创建时由内核分配独立栈。usStackDepth 告诉内核栈应该多大。该值指定栈可容纳的字数,而不是字节数。例如栈宽 32 位、传入 100,则分配 400 字节(100 × 4 字节)。栈深度乘以栈宽不得超过 uint16_t 所能容纳的最大值。空闲任务所用栈大小由 configMINIMAL_STACK_SIZE 定义;所用处理器架构对应的 FreeRTOS 演示工程中赋给该常量的值,是任何任务推荐的最小值。若任务使用大量栈空间,必须赋更大的值。任务所需栈空间没有简单的确定方法:可以计算,但多数用户先给一个自认为合理的值,再利用 FreeRTOS 提供的特性确认分配空间确实够用、且不浪费 RAM。如何查询任务实际使用过的最大栈空间见 12.3 节“栈溢出”。 |
| pvParameters | 任务函数接收一个 void* 类型参数。赋给 pvParameters 的值就是传入任务的值。本书部分示例演示了该参数的用法。 |
| uxPriority | 定义任务执行的优先级。优先级可取 0(最低)到 (configMAX_PRIORITIES – 1)(最高)。configMAX_PRIORITIES 是用户定义常量,见 3.5 节。传入高于 (configMAX_PRIORITIES – 1) 的 uxPriority 值,任务实际优先级会被静默截断到最大合法值。 |
| pxCreatedTask | 用于向外传出所创建任务的句柄。之后可在 API 调用中用该句柄引用任务,例如更改任务优先级或删除任务。若应用不需要任务句柄,可把 pxCreatedTask 设为 NULL。 |
| 返回值 | 有两种可能返回值:pdPASS 表示任务创建成功;pdFAIL 表示任务未被创建,原因是可用堆内存不足,FreeRTOS 无法分配足够 RAM 存放任务数据结构与栈。堆内存管理详见第 2 章。 |
3.4.2示例 1:创建任务
本示例演示创建两个简单任务、再启动任务执行所需的步骤。两个任务只是周期性地打印字符串,用粗糙的空循环产生周期延时。它们以相同优先级创建,除打印的字符串外完全相同,实现见清单 14、15。
void vTask1( void *pvParameters )
{
    const char *pcTaskName = "Task 1 is running\r\n";
    volatile uint32_t ul; /* volatile to ensure ul is not optimized away. */

    /* As per most tasks, this task is implemented in an infinite loop. */
    for( ;; )
    {
        /* Print out the name of this task. */
        vPrintString( pcTaskName );

        /* Delay for a period. */
        for( ul = 0; ul < mainDELAY_LOOP_COUNT; ul++ )
        {
            /* This loop is just a very crude delay implementation.  There is
               nothing to do in here.  Later examples will replace this crude
               loop with a proper delay/sleep function. */
        }
    }
}void vTask2( void *pvParameters )
{
const char *pcTaskName = "Task 2 is running\r\n";
volatile uint32_t ul; /* volatile to ensure ul is not optimized away. */
/* As per most tasks, this task is implemented in an infinite loop. */
for( ;; )
{
/* Print out the name of this task. */
vPrintString( pcTaskName );
/* Delay for a period. */
for( ul = 0; ul < mainDELAY_LOOP_COUNT; ul++ )
{
/* This loop is just a very crude delay implementation. There is
nothing to do in here. Later examples will replace this crude
loop with a proper delay/sleep function. */
}
}
}main() 在启动调度器之前创建任务,实现见清单 16。
int main( void )
{
    /* Create one of the two tasks.  Note that a real application should check
       the return value of the xTaskCreate() call to ensure the task was created
       successfully. */
    xTaskCreate(    vTask1,  /* Pointer to the function that implements the task. */
                    "Task 1",/* Text name for the task.  This is to facilitate
                             debugging only. */
                    1000,    /* Stack depth - small microcontrollers will use much
                             less stack than this. */
                    NULL,    /* This example does not use the task parameter. */
                    1,       /* This task will run at priority 1. */
                    NULL );  /* This example does not use the task handle. */

    /* Create the other task in exactly the same way and at the same priority. */
    xTaskCreate( vTask2, "Task 2", 1000, NULL, 1, NULL );

    /* Start the scheduler so the tasks start executing. */
    vTaskStartScheduler();

    /* If all is well then main() will never reach here as the scheduler will
       now be running the tasks.  If main() does reach here then it is likely that
       there was insufficient heap memory available for the idle task to be created.
       Chapter 2 provides more information on heap memory management. */
    for( ;; );
}运行示例得到图 10 所示输出。
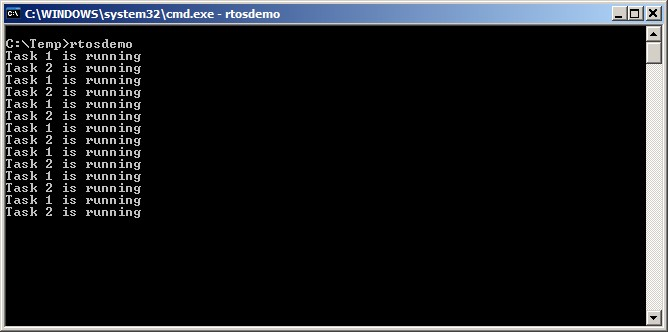
图 10 中两个任务看似同时执行;但由于二者运行在同一处理器核上,这不可能。实际上两个任务在运行态之间快速进入、退出。二者以相同优先级运行,因此在同一核上共享处理时间。真实执行模式见图 11。
图 11 底部箭头表示从时刻 t1 起时间的流逝;彩色线段表示每个时刻正在执行的任务——例如 t1 到 t2 之间是 Task 1 在执行。任一时刻只能有一个任务处于运行态:一个任务进入运行态(切入)时,另一个就进入非运行态(切出)。
示例 1 在 main() 内、调度器启动之前创建任务。也可以在另一个任务内部创建任务,例如 Task 2 可由 Task 1 内部创建,如清单 17 所示。
void vTask1( void *pvParameters )
{
    const char *pcTaskName = "Task 1 is running\r\n";
    volatile uint32_t ul; /* volatile to ensure ul is not optimized away. */

    /* If this task code is executing then the scheduler must already have
       been started.  Create the other task before entering the infinite loop. */
    xTaskCreate( vTask2, "Task 2", 1000, NULL, 1, NULL );

    for( ;; )
    {
        /* Print out the name of this task. */
        vPrintString( pcTaskName );

        /* Delay for a period. */
        for( ul = 0; ul < mainDELAY_LOOP_COUNT; ul++ )
        {
            /* This loop is just a very crude delay implementation.  There is
               nothing to do in here.  Later examples will replace this crude
               loop with a proper delay/sleep function. */
        }
    }
}3.4.3示例 2:使用任务参数
示例 1 创建的两个任务几乎相同,唯一区别是打印的文本字符串。可以改为只创建单一任务实现的两个实例,消除重复;再用任务参数把每个任务应打印的字符串传入。清单 18 是示例 2 使用的单一任务函数 vTaskFunction,它取代示例 1 中的两个任务函数 vTask1、vTask2。注意任务参数如何被转换为 char *,以取得任务应打印的字符串。
void vTaskFunction( void *pvParameters )
{
    char *pcTaskName;
    volatile uint32_t ul; /* volatile to ensure ul is not optimized away. */

    /* The string to print out is passed in via the parameter.  Cast this to a
       character pointer. */
    pcTaskName = ( char * ) pvParameters;

    /* As per most tasks, this task is implemented in an infinite loop. */
    for( ;; )
    {
        /* Print out the name of this task. */
        vPrintString( pcTaskName );

        /* Delay for a period. */
        for( ul = 0; ul < mainDELAY_LOOP_COUNT; ul++ )
        {
            /* This loop is just a very crude delay implementation.  There is
               nothing to do in here.  Later exercises will replace this crude
               loop with a proper delay/sleep function. */
        }
    }
}虽然现在只有一个任务实现(vTaskFunction),仍可创建该任务的多个实例;每个被创建的实例都在 FreeRTOS 调度器控制下独立执行。清单 19 演示如何用 xTaskCreate() 的 pvParameters 参数把文本字符串传入任务。
/* Define the strings that will be passed in as the task parameters.  These are
   defined const and not on the stack to ensure they remain valid when the tasks are
   executing. */
static const char *pcTextForTask1 = "Task 1 is running\r\n";
static const char *pcTextForTask2 = "Task 2 is running\r\n";

int main( void )
{
    /* Create one of the two tasks. */
    xTaskCreate(    vTaskFunction,          /* Pointer to the function that
                                             implements the task. */
                    "Task 1",               /* Text name for the task.  This is to
                                             facilitate debugging only. */
                    1000,                   /* Stack depth - small microcontrollers
                                             will use much less stack than this. */
                    (void*)pcTextForTask1,  /* Pass the text to be printed into the
                                             task using the task parameter. */
                    1,                      /* This task will run at priority 1. */
                    NULL );                 /* The task handle is not used in this
                                             example. */

    /* Create the other task in exactly the same way.  Note this time that multiple
       tasks are being created from the SAME task implementation (vTaskFunction).  Only
       the value passed in the parameter is different.  Two instances of the same
       task are being created. */
    xTaskCreate( vTaskFunction, "Task 2", 1000, (void*)pcTextForTask2, 1, NULL );

    /* Start the scheduler so the tasks start executing. */
    vTaskStartScheduler();

    /* If all is well then main() will never reach here as the scheduler will
       now be running the tasks.  If main() does reach here then it is likely that
       there was insufficient heap memory available for the idle task to be created.
       Chapter 2 provides more information on heap memory management. */
    for( ;; );
}示例 2 的输出与示例 1 的图 10 完全相同。
3.5任务优先级
xTaskCreate() 的 uxPriority 参数为被创建任务赋予初始优先级;调度器启动后,可用 vTaskPrioritySet() API 函数更改优先级。
可用优先级的最大数量由 FreeRTOSConfig.h 中应用定义的 configMAX_PRIORITIES 编译期配置常量设定。数值越小优先级越低,优先级 0 是可能的最低优先级,因此可用优先级范围为 0 到 (configMAX_PRIORITIES – 1)。任意数量的任务都可以共享同一优先级,从而保证最大的设计灵活性。
FreeRTOS 调度器可用两种方法之一决定哪个任务进入运行态。configMAX_PRIORITIES 可设的最大值取决于所用方法:
- 通用方法(Generic Method):用 C 实现,可用于所有 FreeRTOS 架构移植层。使用通用方法时,FreeRTOS 不限制
configMAX_PRIORITIES的最大值;但仍建议把它保持在必要的最小值,因为取值越大,消耗的 RAM 越多、最坏执行时间越长。当FreeRTOSConfig.h中configUSE_PORT_OPTIMISED_TASK_SELECTION设为 0、或该宏未定义、或所用 FreeRTOS 移植层只提供通用方法时,使用通用方法。 - 架构优化方法(Architecture Optimized Method):使用少量汇编代码,比通用方法快,且
configMAX_PRIORITIES的取值不影响最坏执行时间。若使用架构优化方法,configMAX_PRIORITIES不能大于 32;与通用方法一样,建议保持在必要最小值,因为取值越大消耗 RAM 越多。当configUSE_PORT_OPTIMISED_TASK_SELECTION设为 1 时使用架构优化方法。并非所有 FreeRTOS 移植层都提供该方法。
FreeRTOS 调度器始终保证:能运行的最高优先级任务被选入运行态。当同一优先级有多个任务能运行时,调度器会轮流把每个任务切入、切出运行态。
3.6时间测量与节拍中断
3.12 节“调度算法”介绍了可选特性“时间片(time slicing)”。前面示例都使用了时间片,其输出表现出的行为正是如此:两个任务以相同优先级创建,且始终能运行;于是每个任务执行一个“时间片”,在时间片起点进入运行态,在时间片终点退出运行态。图 11 中 t1 到 t2 的时间就等于一个时间片。
为了选出下一个运行的任务,调度器本身必须在每个时间片末尾执行。为此使用一个周期性中断,称为“节拍中断(tick interrupt)”。时间片长度实际上由节拍中断频率设定,该频率由 FreeRTOSConfig.h 中应用定义的 configTICK_RATE_HZ 编译期配置常量配置。例如 configTICK_RATE_HZ 设为 100(Hz),时间片就是 10 毫秒。两次节拍中断之间的时间称为“节拍周期(tick period)”,一个时间片等于一个节拍周期。
图 11 可以扩展为把调度器自身的执行也画进执行序列,见图 12:最上方线段显示调度器何时在执行,细箭头表示从任务到节拍中断、再从节拍中断回到另一个任务的执行顺序。configTICK_RATE_HZ 的最佳取值取决于所开发的应用,100 是典型值。
FreeRTOS API 调用始终以节拍周期的倍数指定时间,常简称为“节拍(ticks)”。pdMS_TO_TICKS() 宏把毫秒指定的时间换算为节拍指定的时间。可用分辨率取决于定义的节拍频率;当节拍频率高于 1 kHz(configTICK_RATE_HZ 大于 1000)时,不能使用 pdMS_TO_TICKS()。清单 20 演示如何用它把 200 毫秒换算为等价值的节拍。
/* pdMS_TO_TICKS() takes a time in milliseconds as its only parameter, and evaluates
   to the equivalent time in tick periods. This example shows xTimeInTicks being set to
   the number of tick periods that are equivalent to 200 milliseconds. */
TickType_t xTimeInTicks = pdMS_TO_TICKS( 200 );
pdMS_TO_TICKS() 以毫秒指定,这样即使节拍频率改变,应用中指定的时间也不会跟着变。“节拍计数(tick count)”值是自调度器启动以来发生的节拍中断总数(假定未发生溢出)。用户应用在指定延时时不必考虑溢出,时间一致性由 FreeRTOS 内部管理。
3.6.1示例 3:优先级实验
调度器始终保证能运行的最高优先级任务被选入运行态。前面示例中两个任务以相同优先级创建,因此轮流进入、退出运行态。本示例考察改变示例 2 中两个任务之一的优先级后会发生什么:这次第一个任务以优先级 1 创建,第二个以优先级 2 创建。创建任务的代码见清单 21;实现两个任务的单一函数没有变化,仍是周期性打印字符串、用空循环延时。
/* Define the strings that will be passed in as the task parameters.  These are
   defined const and not on the stack to ensure they remain valid when the tasks are
   executing. */
static const char *pcTextForTask1 = "Task 1 is running\r\n";
static const char *pcTextForTask2 = "Task 2 is running\r\n";

int main( void )
{
    /* Create the first task at priority 1.  The priority is the second to last
       parameter. */
    xTaskCreate( vTaskFunction, "Task 1", 1000, (void*)pcTextForTask1, 1, NULL );

    /* Create the second task at priority 2, which is higher than a priority of 1.
       The priority is the second to last parameter. */
    xTaskCreate( vTaskFunction, "Task 2", 1000, (void*)pcTextForTask2, 2, NULL );

    /* Start the scheduler so the tasks start executing. */
    vTaskStartScheduler();

    /* Will not reach here. */
    return 0;
}示例 3 的输出见图 13。
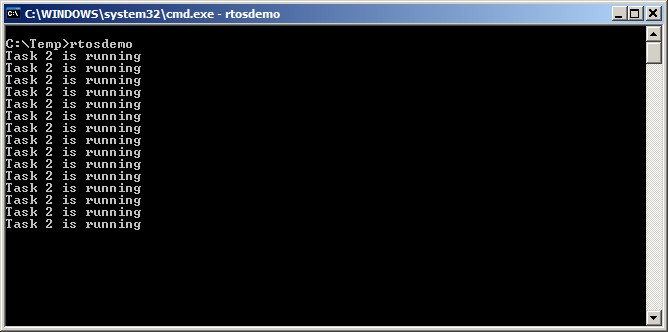
调度器始终选择能运行的最高优先级任务。Task 2 优先级高于 Task 1,且始终能运行;因此只有 Task 2 进入运行态。Task 1 从不进入运行态,也就从不打印字符串。称 Task 1 被 Task 2 “饿死(starved)”了处理时间。
Task 2 始终能运行,是因为它不必等待任何东西——要么在空循环里打转,要么向终端打印。示例 3 的执行序列见图 14。
3.7扩展“非运行”状态
到目前为止创建的任务总有处理要做,从未需要等待任何事件——因此它们总是能进入运行态。这种“连续处理”型任务用途有限,因为只能创建在最低优先级;若在其他任何优先级运行,就会让低优先级任务完全无法运行。要让任务有用,必须改写为事件驱动型:事件驱动任务只有在触发它的事件发生后才有工作(处理)要做,事件发生前不能进入运行态。调度器始终选择能运行的最高优先级任务;高优先级任务不能运行,调度器就无法选它们,而必须改选能运行的低优先级任务。因此使用事件驱动任务,可以把任务创建在不同优先级,而不会让最高优先级任务饿死所有低优先级任务的处理时间。
3.7.1阻塞态
等待事件的任务称为处于“阻塞(Blocked)”态,它是非运行态的一个子状态。任务可进入阻塞态等待两类事件:
- 时间性事件(与时间相关):事件是一段延时到期,或到达某个绝对时刻。例如任务可进入阻塞态等待 10 毫秒过去。
- 同步事件:事件来自另一个任务或中断。例如任务可进入阻塞态等待队列上有数据到达。同步事件涵盖很广的事件类型。FreeRTOS 队列、二值信号量、计数信号量、互斥量、递归互斥量、事件组以及直达任务通知,都可用来产生同步事件,本书后续章节逐一介绍。
任务可以带超时地阻塞在同步事件上,实际上同时阻塞在两类事件上。例如任务最多等待队列上 10 毫秒内有数据到达:若 10 毫秒内数据到达,或 10 毫秒过去仍无数据到达,任务都会离开阻塞态。
3.7.2挂起态
“挂起(Suspended)”也是非运行态的子状态。处于挂起态的任务对调度器不可用。进入挂起态的唯一途径是调用 vTaskSuspend() API,离开的唯一途径是调用 vTaskResume() 或 xTaskResumeFromISR() API。多数应用不使用挂起态。
3.7.3就绪态
处于非运行态、但既不阻塞也不挂起的任务称为处于“就绪(Ready)”态。它们能够运行、因而“就绪”,但当前不在运行态。
3.7.4补全状态跳转图
图 15 在前面过度简化的状态图基础上,加入本节描述的全部非运行子状态。前面示例创建的任务未使用阻塞态或挂起态,只在就绪态与运行态之间跳转——图 15 中以粗线标出。
3.7.5示例 4:用阻塞态产生延时
前面示例创建的任务都是“周期性”的:延时一段时间、打印字符串,再延时,如此往复。延时一直用空循环非常粗糙地生成——任务实际上在轮询一个递增的循环计数器,直到达到固定值。示例 3 清楚暴露了这种方法的缺点:高优先级任务执行空循环期间一直停留在运行态,把低优先级任务饿死,拿不到任何处理时间。
任何形式的轮询还有其他缺点,最突出的是低效:轮询期间任务其实没有工作要做,却仍占用最大处理时间,浪费处理器周期。示例 4 用调用 vTaskDelay() API 取代轮询空循环来纠正这一行为,原型见清单 22;新任务定义见清单 23。注意 vTaskDelay() 仅在 FreeRTOSConfig.h 中 INCLUDE_vTaskDelay 设为 1 时可用。
vTaskDelay() 让调用任务在固定数量的节拍中断内进入阻塞态。任务在阻塞态不占用任何处理时间,只有真正有工作要做时才占用处理时间。
void vTaskDelay( TickType_t xTicksToDelay );
| 参数名 | 说明 |
|---|---|
| xTicksToDelay | 调用任务在被切回就绪态之前,将保持在阻塞态的节拍中断次数。例如节拍计数为 10000 时调用 vTaskDelay( 100 ),任务会立即进入阻塞态,并保持到节拍计数达到 10100。可用 pdMS_TO_TICKS() 宏把毫秒指定的时间换算为节拍指定的时间;例如 vTaskDelay( pdMS_TO_TICKS( 100 ) ) 使调用任务阻塞 100 毫秒。 |
void vTaskFunction( void *pvParameters )
{
    char *pcTaskName;
    const TickType_t xDelay250ms = pdMS_TO_TICKS( 250 );

    /* The string to print out is passed in via the parameter.  Cast this to a
       character pointer. */
    pcTaskName = ( char * ) pvParameters;

    /* As per most tasks, this task is implemented in an infinite loop. */
    for( ;; )
    {
        /* Print out the name of this task. */
        vPrintString( pcTaskName );

        /* Delay for a period.  This time a call to vTaskDelay() is used which places
           the task into the Blocked state until the delay period has expired.  The
           parameter takes a time specified in ‘ticks’, and the pdMS_TO_TICKS() macro
           is used (where the xDelay250ms constant is declared) to convert 250
           milliseconds into an equivalent time in ticks. */
        vTaskDelay( xDelay250ms );
    }
}虽然两个任务仍以不同优先级创建,现在二者都会运行。示例 4 的输出见图 16,证实了预期行为。
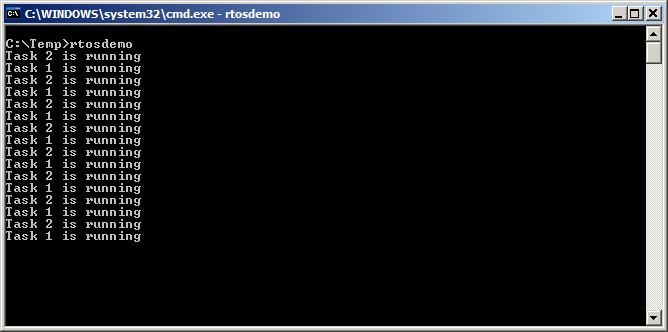
图 17 所示执行序列解释了为何两个任务虽以不同优先级创建却都能运行(为简洁省略了调度器自身的执行)。调度器启动时自动创建空闲任务,以保证始终至少有一个任务能运行(至少有一个就绪态任务)。空闲任务详见 3.8 节。
改变的只是两个任务的实现,而非其功能。对比图 17 与图 12 可清楚看出:同样的功能以高效得多的方式实现。图 12 是任务用空循环产生延时的执行模式——任务始终能运行,结果两个任务合计占用百分之百的可用处理器时间;图 17 是任务在整个延时周期内都进入阻塞态的执行模式——只有真正有工作要做(本例只是打印一条消息)时才占用处理器时间,因此只占用可用处理时间的极小一部分。
在图 17 场景中,任务每次离开阻塞态后只执行不足一个节拍周期,便再次进入阻塞态。多数时候没有能运行的应用任务(就绪态中没有应用任务),因此没有可选入运行态的应用任务;这时空闲任务运行。分配给空闲任务的处理时间量,是衡量系统剩余处理能力的指标。使用 RTOS 让应用完全事件驱动,即可显著提升剩余处理能力。
图 18 粗线标出示例 4 中任务经历的状态跳转:每个任务现在都先经过阻塞态,再回到就绪态。
3.7.6vTaskDelayUntil() API 函数
vTaskDelayUntil() 与 vTaskDelay() 类似。如前所述,vTaskDelay() 的参数指定:任务调用 vTaskDelay() 到该任务再次离开阻塞态之间应发生的节拍中断次数;任务阻塞时长由参数指定,但任务离开阻塞态的时刻相对于调用 vTaskDelay() 的时刻。
而 vTaskDelayUntil() 的参数指定的是调用任务应从阻塞态移入就绪态的确切节拍计数值。当需要固定执行周期(希望任务以固定频率周期性执行)时,应使用 vTaskDelayUntil():调用任务解除阻塞的时刻是绝对时刻,而非相对于函数调用时刻(vTaskDelay() 则是相对的)。
void vTaskDelayUntil( TickType_t * pxPreviousWakeTime, TickType_t xTimeIncrement );
| 参数名 | 说明 |
|---|---|
| pxPreviousWakeTime | 该参数命名基于这样的假设:vTaskDelayUntil() 被用来实现一个以固定频率周期性执行的任务。此时 pxPreviousWakeTime 保存任务上次离开阻塞态(被“唤醒”)的时刻;该时刻作为参考点,计算任务下次应离开阻塞态的时刻。pxPreviousWakeTime 指向的变量在 vTaskDelayUntil() 内部自动更新,通常不应由应用代码修改;但首次使用前必须初始化为当前节拍计数,清单 25 演示了初始化方式。 |
| xTimeIncrement | 该参数同样基于“实现以固定频率周期性执行的任务”这一假设——频率由 xTimeIncrement 值设定。xTimeIncrement 以“节拍”指定;可用 pdMS_TO_TICKS() 宏把毫秒换算为节拍。 |
3.7.7示例 5:把示例任务改为使用 vTaskDelayUntil()
示例 4 创建的两个任务是周期任务,但使用 vTaskDelay() 不能保证其运行频率固定,因为任务离开阻塞态的时刻相对于它们调用 vTaskDelay() 的时刻。把任务改用 vTaskDelayUntil() 取代 vTaskDelay() 即可解决这一潜在问题。
void vTaskFunction( void *pvParameters )
{
    char *pcTaskName;
    TickType_t xLastWakeTime;

    /* The string to print out is passed in via the parameter.  Cast this to a
       character pointer. */
    pcTaskName = ( char * ) pvParameters;

    /* The xLastWakeTime variable needs to be initialized with the current tick
       count.  Note that this is the only time the variable is written to explicitly.
       After this xLastWakeTime is automatically updated within vTaskDelayUntil(). */
    xLastWakeTime = xTaskGetTickCount();

    /* As per most tasks, this task is implemented in an infinite loop. */
    for( ;; )
    {
        /* Print out the name of this task. */
        vPrintString( pcTaskName );

        /* This task should execute every 250 milliseconds exactly.  As per
           the vTaskDelay() function, time is measured in ticks, and the
           pdMS_TO_TICKS() macro is used to convert milliseconds into ticks.
           xLastWakeTime is automatically updated within vTaskDelayUntil(), so is not
           explicitly updated by the task. */
        vTaskDelayUntil( &xLastWakeTime, pdMS_TO_TICKS( 250 ) );
    }
}示例 5 的输出与示例 4 的图 16 完全相同。
3.7.8示例 6:混合阻塞与非阻塞任务
前面示例分别单独考察了轮询任务与阻塞任务的行为。本示例通过演示两种方案组合时的执行序列,进一步印证所述的预期系统行为,步骤如下:
1. 在优先级 1 创建两个任务。它们除持续打印字符串外什么都不做。这两个任务从不调用任何可能使其进入阻塞态的 API,因此始终处于就绪态或运行态。这种性质的任务称为“连续处理(continuous processing)”任务,因为它们总有工作要做(本例只是很琐碎的工作)。连续处理任务的源码见清单 26。
2. 再在优先级 2 创建第三个任务,高于另外两个任务。第三个任务也只是打印字符串,但这次是周期性的,因此使用 vTaskDelayUntil() API,在每次打印迭代之间把自己放入阻塞态。周期任务源码见清单 27。
void vContinuousProcessingTask( void *pvParameters )
{
    char *pcTaskName;

    /* The string to print out is passed in via the parameter.  Cast this to a
       character pointer. */
    pcTaskName = ( char * ) pvParameters;

    /* As per most tasks, this task is implemented in an infinite loop. */
    for( ;; )
    {
        /* Print out the name of this task.  This task just does this repeatedly
           without ever blocking or delaying. */
        vPrintString( pcTaskName );
    }
}void vPeriodicTask( void *pvParameters )
{
TickType_t xLastWakeTime;
const TickType_t xDelay3ms = pdMS_TO_TICKS( 3 );
/* The xLastWakeTime variable needs to be initialized with the current tick
count. Note that this is the only time the variable is explicitly written to.
After this xLastWakeTime is managed automatically by the vTaskDelayUntil()
API function. */
xLastWakeTime = xTaskGetTickCount();
/* As per most tasks, this task is implemented in an infinite loop. */
for( ;; )
{
/* Print out the name of this task. */
vPrintString( "Periodic task is running\r\n" );
/* The task should execute every 3 milliseconds exactly – see the
declaration of xDelay3ms in this function. */
vTaskDelayUntil( &xLastWakeTime, xDelay3ms );
}
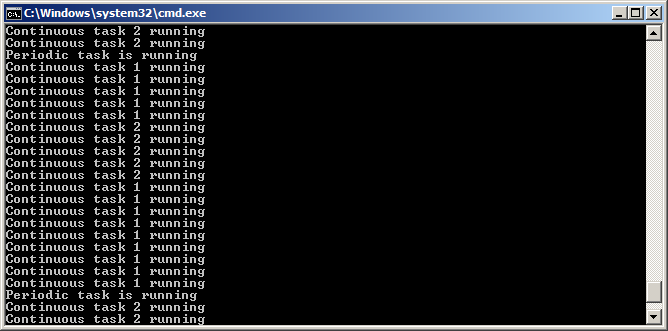
}图 19 为示例 6 产生的输出,观察到的行为由图 20 执行序列解释。
3.8空闲任务与空闲任务钩子
示例 4 创建的任务大部分时间处于阻塞态。在阻塞态时它们不能运行,因此不会被调度器选中。必须始终至少有一个任务能进入运行态。为保证这一点,调用 vTaskStartScheduler() 时调度器会自动创建一个空闲任务。空闲任务除了在一个循环里空转之外几乎不做别的——因此和最初示例中的任务一样,它始终能运行。
空闲任务使用可能的最低优先级(优先级 0),以确保它从不阻止更高优先级的应用任务进入运行态;不过如果需要,应用设计者也可以创建任务共享空闲优先级。FreeRTOSConfig.h 中的 configIDLE_SHOULD_YIELD 编译期配置常量可用于防止空闲任务占用本可更高效分配给应用任务的处理时间,详见 3.12 节“调度算法”。
以最低优先级运行,保证空闲任务在更高优先级任务进入就绪态后立即被切出运行态。这在图 17 的时刻 tn 可以看到:Task 2 离开阻塞态的瞬间,空闲任务立即被换出,让 Task 2 执行。称 Task 2 抢占(pre-empted)了空闲任务。抢占自动发生,被抢占任务并不知情。
vTaskDelete() API,务必不要让空闲任务完全拿不到处理时间。因为任务被删除后,由空闲任务负责清理内核资源。3.8.1空闲任务钩子函数
可以通过空闲钩子(或称空闲回调)函数,把应用专用功能直接加入空闲任务——该函数由空闲任务在空闲任务循环每次迭代时自动调用一次。空闲任务钩子的常见用途包括:
- 执行低优先级、后台或连续处理功能;
- 测量剩余处理能力(空闲任务只在所有更高优先级应用任务都没有工作要做时才运行,因此分配给空闲任务的处理时间量,能清楚指示有多少处理时间是空闲的);
- 把处理器置入低功耗模式:每当没有应用处理要做时,以简单自动的方式省电(不过这种方式能达到的省电效果,不如第 10 章“低功耗支持”所述的无节拍空闲模式)。
3.8.2空闲任务钩子函数的实现限制
空闲任务钩子函数必须遵守以下规则:
- 空闲钩子函数绝不能尝试阻塞或挂起。注意:以任何方式阻塞空闲任务,都可能导致没有任务可进入运行态。
- 若应用使用
vTaskDelete(),空闲钩子必须在合理时间内返回调用者。因为任务删除后由空闲任务清理内核资源;若空闲任务永久停留在空闲钩子函数中,清理就无法进行。
空闲任务钩子函数的名称与原型必须如清单 28 所示。
void vApplicationIdleHook( void );
3.8.3示例 7:定义空闲任务钩子函数
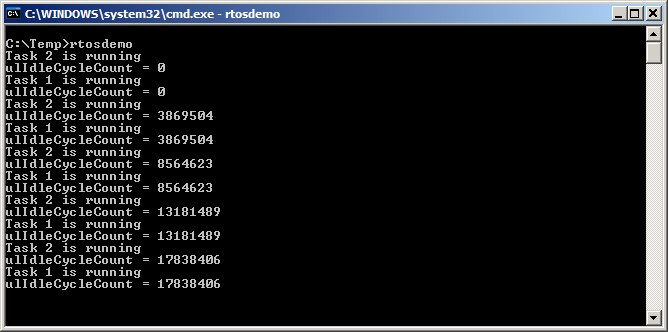
示例 4 中使用阻塞式 vTaskDelay() 调用产生了大量空闲时间——两个应用任务都在阻塞态时,空闲任务正在执行。示例 7 通过添加一个空闲钩子函数利用这段空闲时间,源码见清单 29。
/* Declare a variable that will be incremented by the hook function. */
volatile uint32_t ulIdleCycleCount = 0UL;

/* Idle hook functions MUST be called vApplicationIdleHook(), take no parameters,
   and return void. */
void vApplicationIdleHook( void )
{
    /* This hook function does nothing but increment a counter. */
    ulIdleCycleCount++;
}必须在 FreeRTOSConfig.h 中把 configUSE_IDLE_HOOK 设为 1,空闲钩子函数才会被调用。
实现被创建任务的函数略作修改,打印出 ulIdleCycleCount 值,见清单 30。
void vTaskFunction( void *pvParameters )
{
    char *pcTaskName;
    const TickType_t xDelay250ms = pdMS_TO_TICKS( 250 );

    /* The string to print out is passed in via the parameter.  Cast this to a
       character pointer. */
    pcTaskName = ( char * ) pvParameters;

    /* As per most tasks, this task is implemented in an infinite loop. */
    for( ;; )
    {
        /* Print out the name of this task AND the number of times ulIdleCycleCount
           has been incremented. */
        vPrintStringAndNumber( pcTaskName, ulIdleCycleCount );

        /* Delay for a period of 250 milliseconds. */
        vTaskDelay( xDelay250ms );
    }
}示例 7 的输出见图 21。可以看到:在应用任务每次迭代之间,空闲任务钩子函数被调用约 400 万次(迭代次数取决于运行演示的硬件速度)。
3.9更改任务优先级
3.9.1vTaskPrioritySet() API 函数
vTaskPrioritySet() API 可在调度器启动之后更改任意任务的优先级。注意它仅在 FreeRTOSConfig.h 中 INCLUDE_vTaskPrioritySet 设为 1 时可用。
void vTaskPrioritySet( TaskHandle_t pxTask, UBaseType_t uxNewPriority );
| 参数名 | 说明 |
|---|---|
| pxTask | 要更改优先级的任务(主体任务)的句柄;如何获取任务句柄见 xTaskCreate() 的 pxCreatedTask 参数。任务可以用 NULL 代替有效句柄来更改自身优先级。 |
| uxNewPriority | 主体任务要被设置到的优先级。该值会被自动截断到最大可用优先级 (configMAX_PRIORITIES – 1),其中 configMAX_PRIORITIES 是 FreeRTOSConfig.h 中设置的编译期常量。 |
3.9.2uxTaskPriorityGet() API 函数
uxTaskPriorityGet() API 可查询任务优先级。注意它仅在 FreeRTOSConfig.h 中 INCLUDE_uxTaskPriorityGet 设为 1 时可用。
UBaseType_t uxTaskPriorityGet( TaskHandle_t pxTask );
| 参数名 / 返回值 | 说明 |
|---|---|
| pxTask | 要查询优先级的任务(主体任务)的句柄;如何获取任务句柄见 xTaskCreate() 的 pxCreatedTask 参数。任务可以用 NULL 代替有效句柄查询自身优先级。 |
| 返回值 | 当前分配给被查询任务的优先级。 |
3.9.3示例 8:更改任务优先级
调度器始终选择最高优先级的就绪态任务进入运行态。示例 8 用 vTaskPrioritySet() API 更改两个任务相互之间的优先级,演示这一点。
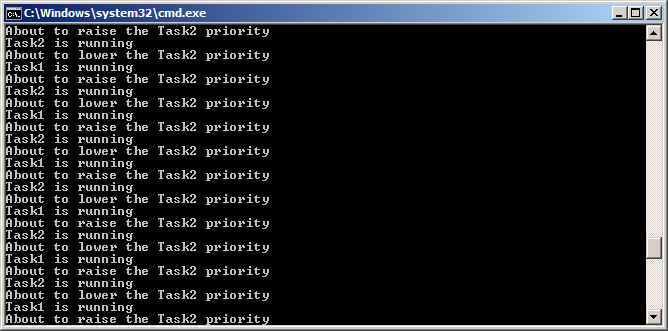
示例 8 以两个不同优先级创建两个任务。两个任务都不调用任何可能使其进入阻塞态的 API,因此始终处于就绪态或运行态。于是相对优先级最高的任务,总是被调度器选入运行态。示例 8 行为如下:
- 1. Task 1(清单 33)以最高优先级创建,保证先运行。Task 1 打印几条字符串后,把 Task 2(清单 34)的优先级提升到自身之上。
- 2. Task 2 一旦成为相对优先级最高的任务就开始运行(进入运行态)。任一时刻只能有一个任务处于运行态,因此 Task 2 在运行态时,Task 1 在就绪态。
- 3. Task 2 打印一条消息后,把自己的优先级降回 Task 1 之下。
- 4. Task 2 降回优先级后,Task 1 再次成为最高优先级任务,于是重新进入运行态,把 Task 2 逼回就绪态。
void vTask1( void *pvParameters )
{
    UBaseType_t uxPriority;

    /* This task will always run before Task 2 as it is created with the higher
       priority.  Neither Task 1 nor Task 2 ever block so both will always be in
       either the Running or the Ready state.
       Query the priority at which this task is running - passing in NULL means
       "return the calling task’s priority". */
    uxPriority = uxTaskPriorityGet( NULL );

    for( ;; )
    {
        /* Print out the name of this task. */
        vPrintString( "Task 1 is running\r\n" );

        /* Setting the Task 2 priority above the Task 1 priority will cause
           Task 2 to immediately start running (as then Task 2 will have the higher
           priority of the two created tasks).  Note the use of the handle to task
           2 (xTask2Handle) in the call to vTaskPrioritySet().  Listing 35 shows how
           the handle was obtained. */
        vPrintString( "About to raise the Task 2 priority\r\n" );
        vTaskPrioritySet( xTask2Handle, ( uxPriority + 1 ) );

        /* Task 1 will only run when it has a priority higher than Task 2.
           Therefore, for this task to reach this point, Task 2 must already have
           executed and set its priority back down to below the priority of this
           task. */
    }
}void vTask2( void *pvParameters )
{
UBaseType_t uxPriority;
/* Task 1 will always run before this task as Task 1 is created with the
higher priority. Neither Task 1 nor Task 2 ever block so will always be
in either the Running or the Ready state.
Query the priority at which this task is running - passing in NULL means
"return the calling task’s priority". */
uxPriority = uxTaskPriorityGet( NULL );
for( ;; )
{
/* For this task to reach this point Task 1 must have already run and
set the priority of this task higher than its own.
Print out the name of this task. */
vPrintString( "Task 2 is running\r\n" );
/* Set the priority of this task back down to its original value.
Passing in NULL as the task handle means "change the priority of the
calling task". Setting the priority below that of Task 1 will cause
Task 1 to immediately start running again – pre-empting this task. */
vPrintString( "About to lower the Task 2 priority\r\n" );
vTaskPrioritySet( NULL, ( uxPriority - 2 ) );
}
}每个任务都可以不使用有效任务句柄,仅用 NULL 就能查询和设置自身优先级。只有当任务希望引用自身以外的任务时才需要任务句柄,例如 Task 1 更改 Task 2 优先级。为让 Task 1 做到这一点,Task 2 的句柄在创建时获取并保存,清单 35 的注释中已标出。
/* Declare a variable that is used to hold the handle of Task 2. */
TaskHandle_t xTask2Handle = NULL;

int main( void )
{
    /* Create the first task at priority 2.  The task parameter is not used
       and set to NULL.  The task handle is also not used so is also set to NULL. */
    xTaskCreate( vTask1, "Task 1", 1000, NULL, 2, NULL );
    /* The task is created at priority 2 ______. */

    /* Create the second task at priority 1 - which is lower than the priority
       given to Task 1.  Again the task parameter is not used so is set to NULL -
       BUT this time the task handle is required so the address of xTask2Handle
       is passed in the last parameter. */
    xTaskCreate( vTask2, "Task 2", 1000, NULL, 1, &xTask2Handle );
    /* The task handle is the last parameter ^^^^^^^^^^^^^ */

    /* Start the scheduler so the tasks start executing. */
    vTaskStartScheduler();

    /* If all is well then main() will never reach here as the scheduler will
       now be running the tasks.  If main() does reach here then it is likely there
       was insufficient heap memory available for the idle task to be created.
       Chapter 2 provides more information on heap memory management. */
    for( ;; );
}图 22 演示示例 8 任务的执行顺序,由此产生的输出见图 23。
3.10删除任务
3.10.1vTaskDelete() API 函数
任务可用 vTaskDelete() API 删除自身或任何其他任务。注意它仅在 FreeRTOSConfig.h 中 INCLUDE_vTaskDelete 设为 1 时可用。被删除的任务不再存在,不能再次进入运行态。
已删除任务所分配内存的释放由空闲任务负责。因此使用 vTaskDelete() 的应用务必不要让空闲任务完全拿不到处理时间。
void vTaskDelete( TaskHandle_t pxTaskToDelete );
| 参数名 / 返回值 | 说明 |
|---|---|
| pxTaskToDelete | 要删除的任务(主体任务)的句柄;如何获取任务句柄见 xTaskCreate() 的 pxCreatedTask 参数。任务可以用 NULL 代替有效句柄删除自身。 |
3.10.2示例 9:删除任务
这是一个非常简单的示例,行为如下:
- 1.
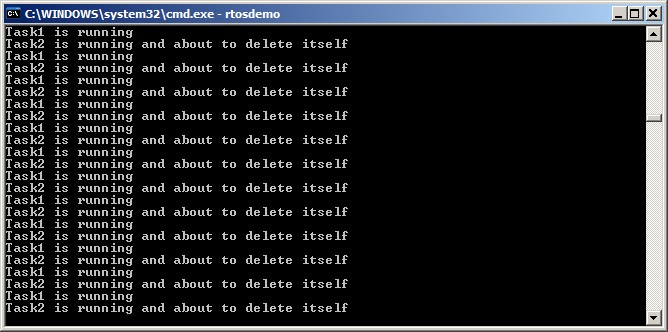
main()以优先级 1 创建 Task 1。Task 1 运行时以优先级 2 创建 Task 2。Task 2 现在是最高优先级任务,立即开始执行。main()源码见清单 37,Task 1 源码见清单 38。 - 2. Task 2 除删除自身外什么都不做。它本可以向
vTaskDelete()传 NULL 删除自身,但为演示起见,使用了自己的任务句柄。Task 2 源码见清单 39。 - 3. Task 2 删除后,Task 1 再次成为最高优先级任务,继续执行——此时它调用
vTaskDelay()阻塞一小段时间。 - 4. Task 1 处于阻塞态期间,空闲任务执行,并释放此前分配给已删除 Task 2 的内存。
- 5. Task 1 离开阻塞态后,再次成为最高优先级就绪态任务,抢占空闲任务。进入运行态后再次创建 Task 2,如此往复。
int main( void )
{
    /* Create the first task at priority 1.  The task parameter is not used
       so is set to NULL.  The task handle is also not used so likewise is set
       to NULL. */
    xTaskCreate( vTask1, "Task 1", 1000, NULL, 1, NULL );
    /* The task is created at priority 1 ______. */

    /* Start the scheduler so the task starts executing. */
    vTaskStartScheduler();

    /* main() should never reach here as the scheduler has been started. */
    for( ;; );
}TaskHandle_t xTask2Handle = NULL;
void vTask1( void *pvParameters )
{
const TickType_t xDelay100ms = pdMS_TO_TICKS( 100UL );
for( ;; )
{
/* Print out the name of this task. */
vPrintString( "Task 1 is running\r\n" );
/* Create task 2 at a higher priority. Again the task parameter is not
used so is set to NULL - BUT this time the task handle is required so
the address of xTask2Handle is passed as the last parameter. */
xTaskCreate( vTask2, "Task 2", 1000, NULL, 2, &xTask2Handle );
/* The task handle is the last parameter ^^^^^^^^^^^^^ */
/* Task 2 has/had the higher priority, so for Task 1 to reach here Task 2
must have already executed and deleted itself. Delay for 100
milliseconds. */
vTaskDelay( xDelay100ms );
}
}void vTask2( void *pvParameters )
{
/* Task 2 does nothing but delete itself. To do this it could call vTaskDelete()
using NULL as the parameter, but instead, and purely for demonstration purposes,
it calls vTaskDelete() passing its own task handle. */
vPrintString( "Task 2 is running and about to delete itself\r\n" );
vTaskDelete( xTask2Handle );
}
3.11线程局部存储
3.12调度算法
3.12.1回顾任务状态与事件
实际在运行(使用处理时间)的任务处于运行态。在单核处理器上,任一时刻只能有一个任务处于运行态。
实际不在运行、但既不在阻塞态也不在挂起态的任务,处于就绪态。就绪态任务可供调度器选入运行态。调度器始终选择最高优先级的就绪态任务进入运行态。
任务可在阻塞态等待事件,事件发生时自动被移回就绪态。时间性事件在特定时刻发生,例如阻塞时间到期,通常用于实现周期性或超时行为。同步事件在任务或中断服务程序使用任务通知、队列、事件组或某类信号量发送信息时发生,通常用于通知异步活动,例如外设数据到达。
3.12.2配置调度算法
调度算法是决定哪个就绪态任务转入运行态的软件例程。前面所有示例使用同一调度算法;该算法可通过 configUSE_PREEMPTION 与 configUSE_TIME_SLICING 两个配置常量更改,二者都定义在 FreeRTOSConfig.h 中。
第三个配置常量 configUSE_TICKLESS_IDLE 也会影响调度算法,因为使用它可能导致节拍中断在较长时间内完全关闭。configUSE_TICKLESS_IDLE 是专为必须尽量降低功耗的应用提供的进阶选项,见第 10 章“低功耗支持”。本节描述假定 configUSE_TICKLESS_IDLE 设为 0,这也是该宏未定义时的默认值。
在所有可能的配置下,FreeRTOS 调度器都会保证:共享同一优先级的任务被轮流选入运行态。这种“轮流来”策略常称为“轮转调度(Round Robin Scheduling)”。轮转调度算法并不保证时间在同等优先级任务之间平均分配,只保证同等优先级的就绪态任务会轮流进入运行态。
3.12.3带时间片的固定优先级抢占式调度
表 14 所示配置把 FreeRTOS 调度器设置为使用“带时间片的固定优先级抢占式调度”算法,这是多数小型 RTOS 应用使用的调度算法,也是本书前面所有示例使用的算法。算法名称中术语的含义见表 15。
| 常量 | 取值 |
|---|---|
| configUSE_PREEMPTION | 1 |
| configUSE_TIME_SLICING | 1 |
| 术语 | 定义 |
|---|---|
| 固定优先级(Fixed Priority) | 称为“固定优先级”的调度算法不改变分配给被调度任务的优先级,但也不阻止任务自身更改自身或其他任务的优先级。 |
| 抢占式(Pre-emptive) | 抢占式调度算法:一旦有优先级高于运行态任务的任务进入就绪态,会立即“抢占”运行态任务。被抢占意味着被非自愿地(未显式让出或阻塞)移出运行态、进入就绪态,以让另一个任务进入运行态。 |
| 时间片(Time Slicing) | 时间片用于在同等优先级任务之间共享处理时间,即使任务没有显式让出或进入阻塞态。称为使用“时间片”的调度算法:如果存在与运行任务同优先级的其他就绪态任务,会在每个时间片末尾选一个新任务进入运行态。一个时间片等于两次 RTOS 节拍中断之间的时间。 |
图 26、图 27 演示使用带时间片的固定优先级抢占式算法时任务如何调度。图 26 演示应用中所有任务优先级互不相同的情况;图 27 演示应用中有两个任务共享同一优先级的情况。
图 27 显示空闲任务与应用作者创建的任务共享处理时间。如果应用作者创建的空闲优先级任务有工作要做、而空闲任务没有,给空闲任务分配这么多处理时间未必理想。configIDLE_SHOULD_YIELD 编译期配置常量可改变空闲任务的调度方式:
- 若
configIDLE_SHOULD_YIELD设为 0,空闲任务会在整个时间片内保持运行态,除非被更高优先级任务抢占。 - 若设为 1,只要就绪态中存在其他空闲优先级任务,空闲任务就在其循环每次迭代时让出(自愿放弃所分配时间片的剩余部分)。
图 27 所示执行模式对应 configIDLE_SHOULD_YIELD 设为 0;同一在场景下设为 1 时观察到的执行模式见图 28。
configIDLE_SHOULD_YIELD 设为 1 时,空闲任务之后被选入运行态的任务不执行完整时间片,只执行空闲任务让出时该时间片的剩余部分。3.12.4固定优先级抢占式调度(不带时间片)
不带时间片的抢占式调度,保持与上一节相同的任务选择与抢占算法,但不使用时间片在同等优先级任务之间共享处理时间。配置 FreeRTOS 调度器使用不带时间片的抢占式调度的 FreeRTOSConfig.h 设置见表 16。
| 常量 | 取值 |
|---|---|
| configUSE_PREEMPTION | 1 |
| configUSE_TIME_SLICING | 0 |
如图 27 所示:若使用时间片,且最高优先级上有多个能运行的就绪态任务,调度器会在每次 RTOS 节拍中断(标记一个时间片结束)期间选一个新任务进入运行态;若不使用时间片,调度器只在以下两种情况选新任务进入运行态:
- 更高优先级任务进入就绪态;
- 运行态任务进入阻塞态或挂起态。
不使用时间片时任务上下文切换次数少于使用时间片时,因此关闭时间片可降低调度器的处理开销。但关闭时间片也可能导致同等优先级任务分到的处理时间相差很大,图 29 演示了这一场景。因此,不带时间片运行调度器被视为进阶技巧,只应由有经验的用户使用。
3.12.5协作式调度
本书聚焦抢占式调度,但 FreeRTOS 也可使用协作式调度。配置 FreeRTOS 调度器使用协作式调度的 FreeRTOSConfig.h 设置见表 17。
| 常量 | 取值 |
|---|---|
| configUSE_PREEMPTION | 0 |
| configUSE_TIME_SLICING | 任意值 |
使用协作式调度器时,只有在运行态任务进入阻塞态、或运行态任务通过调用 taskYIELD() 显式让出(手动请求重新调度)时,才会发生上下文切换。任务从不被抢占,因此不能使用时间片。图 30 演示协作式调度器的行为,图中水平虚线表示任务处于就绪态的时间。
taskYIELD()。Task 2 优先级介于 Task 1 与 Task 3 之间,开始处于阻塞态等待 Task 3 在 t2 发给它的消息;t2 时 Task 2 是最高优先级就绪态任务,若用抢占式调度器会成为运行态任务,但协作式调度器下,Task 2 一直留在就绪态,直到运行态任务进入阻塞态或调用 taskYIELD()。运行态任务在 t4 调用 taskYIELD(),但此时 Task 1 才是最高优先级就绪态任务,因此 Task 2 直到 Task 1 在 t5 重新进入阻塞态后才真正成为运行态任务;t6 Task 2 重新进入阻塞态等待下一条消息,此时 Task 3 再次成为最高优先级就绪态任务。在多任务应用中,应用作者必须注意资源不能被多个任务同时访问,因为同时访问可能破坏资源。以 UART(串口)为例:两个任务向 UART 写字符串,Task 1 写 “abcdefghijklmnop”,Task 2 写 “123456789”:
- 1. Task 1 在运行态开始写字符串,向 UART 写出 “abcdefg”,但在写出更多字符前离开运行态。
- 2. Task 2 进入运行态,向 UART 写出 “123456789”,然后离开运行态。
- 3. Task 1 重新进入运行态,把字符串剩余字符写入 UART。
在该场景中实际写到 UART 的是 “abcdefg123456789hijklmnop”。Task 1 写的字符串并未按预期不间断地写入 UART,反而被破坏,因为 Task 2 写给 UART 的字符串出现在了其中。
通常,使用协作式调度器比使用抢占式调度器更容易避免同时访问引发的问题:
- 使用抢占式调度器时,运行态任务随时可能被抢占,包括在它与另一个任务共享的资源处于不一致状态时。正如上面 UART 示例所示,让资源处于不一致状态可能导致数据破坏。
- 使用协作式调度器时,何时切换到另一个任务由应用作者控制;因此应用作者可以保证资源处于不一致状态时不会发生切换。
- 在上述 UART 示例中,应用作者可以保证 Task 1 在整个字符串写入 UART 之前不离开运行态,从而消除字符串被另一任务活动破坏的可能。
如图 30 所示,使用协作式调度器的系统响应不如使用抢占式调度器:
- 使用抢占式调度器时,任务一旦成为最高优先级就绪态任务,调度器就立即开始运行它。在必须在规定时间内响应高优先级事件的实时系统中,这一点往往至关重要。
- 使用协作式调度器时,切换到已成为最高优先级就绪态任务的动作,要等到运行态任务进入阻塞态或调用
taskYIELD()才执行。